Working with git-worktree and Running AI Agents across multiple branches
Learn how `git worktree` enables you to work across multiple branches simultaneously, making it easier to run parallel AI agent tasks without constantly switching contexts or interrupting your workflow.
Introduction
Have you ever wanted to ask an AI agent to handle a task, only to be blocked by a loading spinner?
When AI agents are handling long-running tasks, it becomes difficult to continue working on other features without constantly switching contexts.
git worktree solves this by allowing multiple branches to be checkout into separate directories at the same time. This makes it possible to run multiple AI agents in parallel without waiting for previous tasks to finish.
This document explains how Git worktrees function, how to structure projects around them, and how to efficiently use AI agents across multiple worktrees.
What is git-worktree?
Git normally allows only one checkout branch per repository directory.
Historically, the most common way to work on multiple branches simultaneously was to clone the repository multiple times. However, this method has some drawbacks:
- Each clone maintains its own
.gitdatabase → local branches, stashes, and references are not shared. - Setup is slower because every clone may need to fetch and unpack the entire repository history.
- It is easier to accidentally work on the same branch in multiple clones and overwrite or rebase conflicting changes.
- Each clone must be fetched and updated independently.
git worktree allows us to create additional working directories connected to the same Git repository.
Each worktree has its own checkout branch, maintains its own filesystem state while sharing the same Git object database. Worktree works similar to independent clone, just without its drawbacks.
Basic Git Worktree Commands
Create a New Worktree
git worktree add ../project__feature-abc
The command above:
- Creates a new sibling directory named
project__feature-abc. - Checkout at
project__feature-abcbranch in the new directory. - Links the new directory to the current repository.
/projects
├── project
└── project__feature-abc (✨ new directory)
We can control the name of the checkout branch in the new directory with a second parameter:
git worktree add ../project__feature-abc feat/abc
Or if the branch doesn't exist yet:
git worktree add ../project__feature-abc -b feat/abc
List Existing Worktrees
git worktree list
Example output:
/path/project                  a1b2c3d [main]
/path/project__feature-abc     d4e5f6g [feat/abc]
/path/project__refactor-api    h7i8j9k [refactor/api]
Remove a Worktree
git worktree remove ../feature-auth
Removes both the worktree and its associated directory.
Prune Stale Worktrees
git worktree prune
Useful when worktree directories were deleted manually.
Example Workflow
Since each worktree exists as its own directory, we can open every worktree independently in our IDE, terminal, or AI-assisted development tool and assign a different task to each AI agent.
Create worktrees
From our main repository, create some worktrees:
git worktree add ../project__auth -b feat/auth
git worktree add ../project__dashboard -b feat/dashboard
git worktree add ../project__update-user -b feat/update-user
This creates corresponding working directories:
/projects
├── project
├── project__auth ✨
├── project__dashboard ✨
└── project__update-user ✨
Assign task to AI agent in each worktree
We can now open each worktree in a separate window or workspace and assign a dedicated AI agent to it.
For example, I open two VSCode windows. In one window, I ask the agent to build the dashboard, while in the other, I ask it to implement an API to update user information:
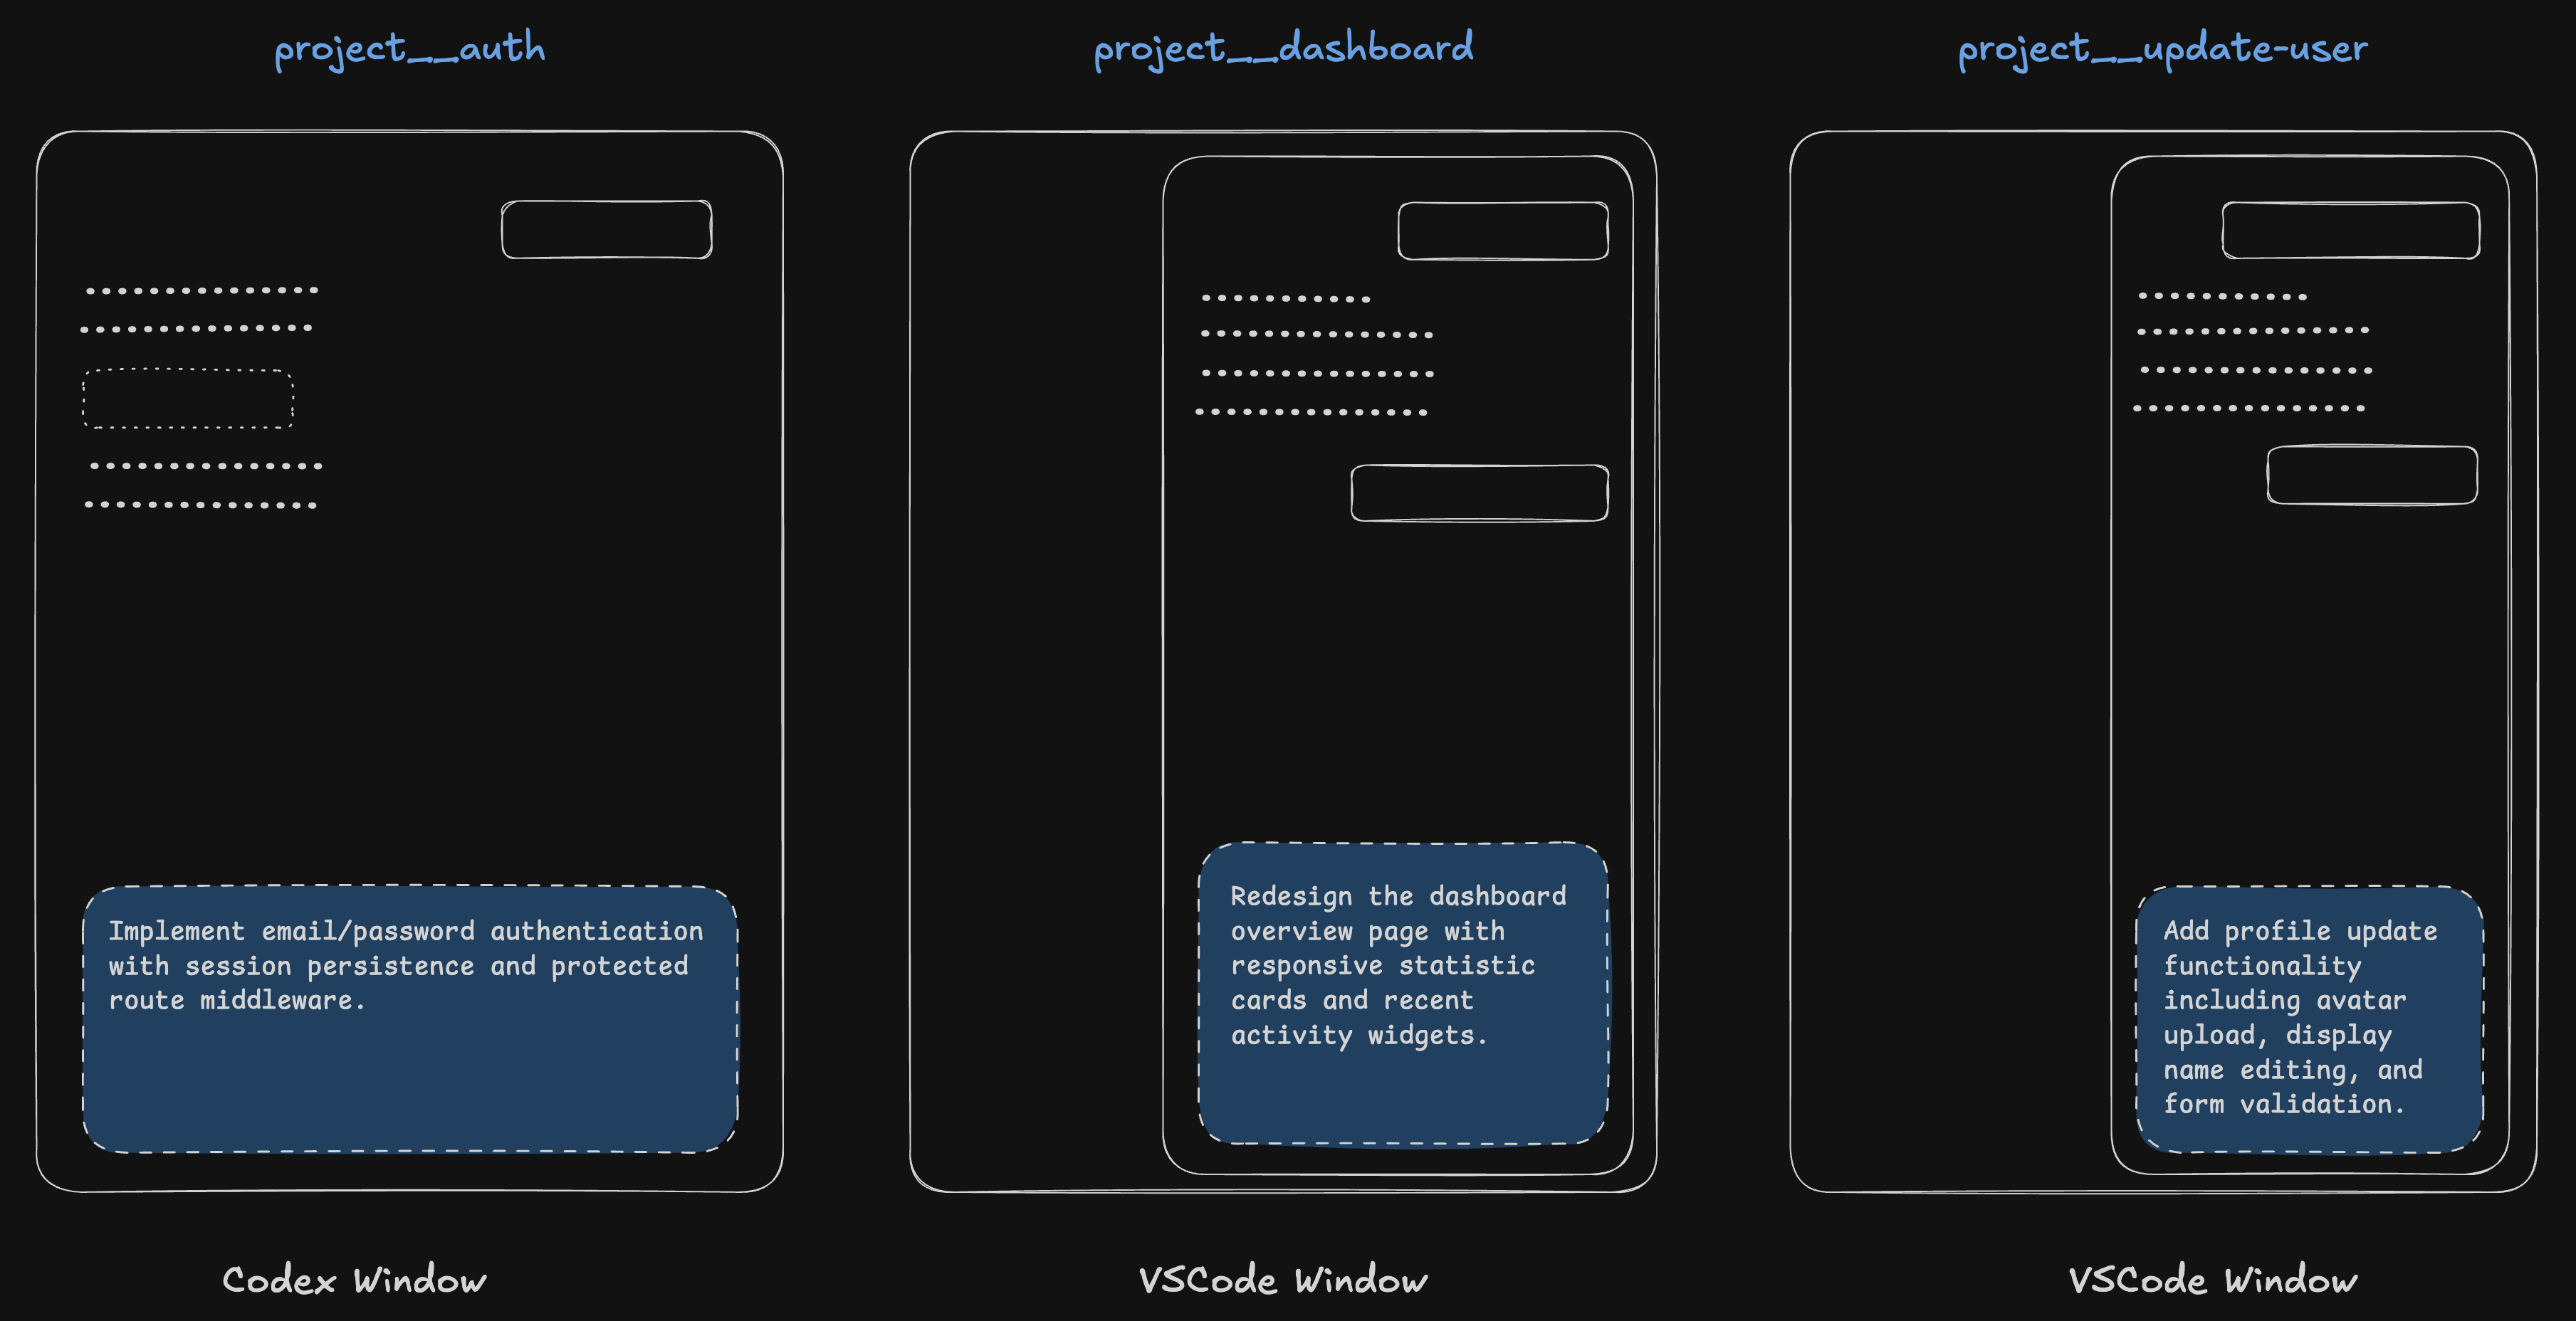
Because each agent operates in its own separate directory, filesystem changes stay isolated, task-specific context remains focused without unrelated work interfering. This prevents long-running agent tasks from blocking the rest of our workflow.
Instead of waiting for one task to finish before starting another, we can switch windows and parallelize development across multiple worktrees.
Commit and push the changes
Once the tasks are complete, we can commit and push changes to their corresponding branches just as we normally would. The difference is that there is no need to constantly stash changes or switch branches. Each git worktree shares the same Git repository database while maintaining its own independent working state.
Recommended Directory Structure
Since every worktree is a separate directory, it is recommended to place worktrees alongside the main repository rather than inside it. This helps prevent unintended file tracking and keeps the repository structure clean.
Example:
✅ Do
projects/
├── project
├── project__auth
├── project__dashboard
├── project__error-code
├── project__hotfix
└── project__refactor-composable

❌ Don't
projects/
└── project
    ├── auth
    ├── dashboard
    ├── error-code
    ├── hotfix
    └── refactor-composable
Managing Dependencies Across Worktrees
When a worktree is created, ignored files are not copied automatically. As a result, each worktree maintains its own node_modules directory.
Install dependencies inside the new worktree:
npm install
We may also need to copy environment files (.env, .furo-env, etc.) from the main repository into each worktree.